
How to Use a Gum Wrapper for Cards or Decorations
I’ve always loved gum wrappers because they tend to have pretty designs and interesting textures that make them perfect for different craft projects. You can make any number of origami designs or even try something even easier.
Simple Waves
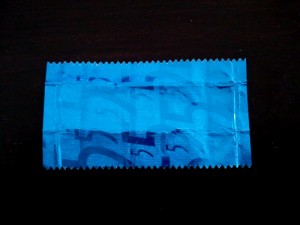
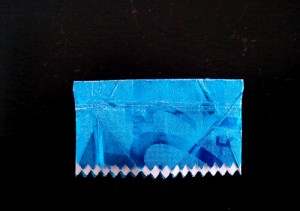
Start off by flattening out the paper.
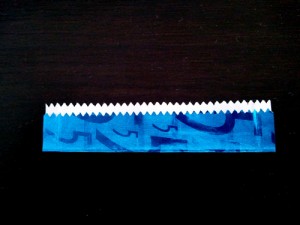
Fold one side up, but not quite to the very top. This will leave a bit of the white paper showing for contrast.
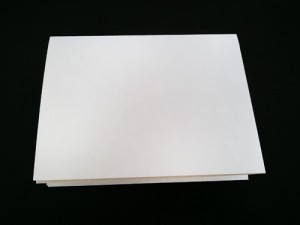
Get some plain card stock or a standard piece of paper folded in half.
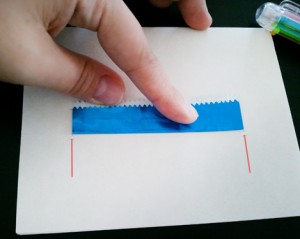
Measure out the width of the gum wrapper (as marked by the red lines). This will create a slit for the wrapper to sit in.
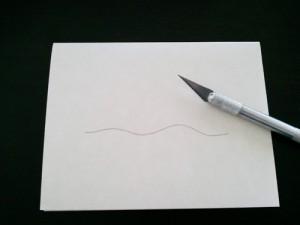
Draw a wavy line from one point to another and cut it out with a scalpel knife.
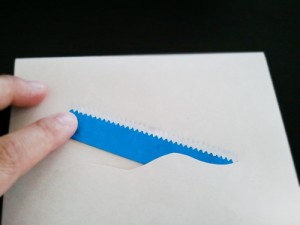
Slip the wrapper in the slit and secure it with a little glue or double-sided tape.
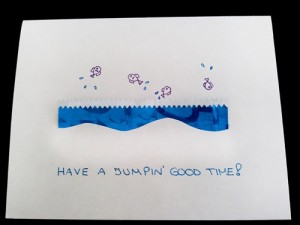
Add some special details like jumping fish or a beach scene and you’re done!
Skirt
Start off with the wave fold and turn it on its side. Fold it in half width wise.
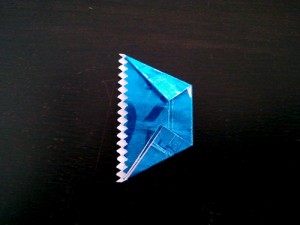
Fold in two corners on a diagonal, making one side narrower than the other.
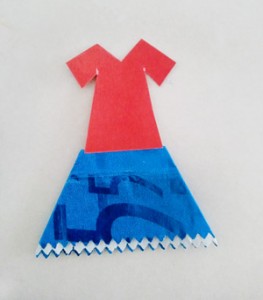
Flip it over and there you have a simple skirt. This is a great idea for inexpensive paper doll clothes.
Mountain
From the base fold used for the skirt, take the opposite corners and fold them in to the middle. This time, make sure one end is much wider than the other.
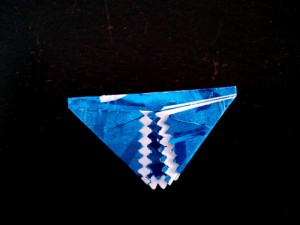
Secure the back with tape or glue and flip it over.
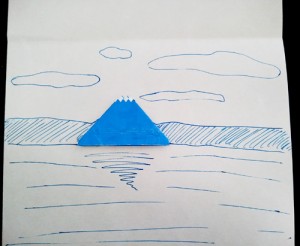
Now you have finished a simple snow-capped mountain! Perfect for paper scenes in frames or on cards!
![]()
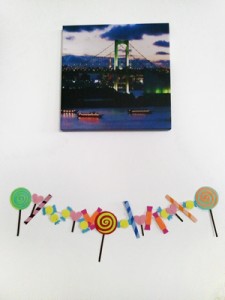
How to Make Fun Candy Garlands from Paper Scaps!
I still have TONS of paper scraps that I want to use, but didn’t have fun ideas for it -until now!
Here is a cute paper craft to make a paper garland that looks like it has a bunch of strung up candies without the sticky mess or the temptation!
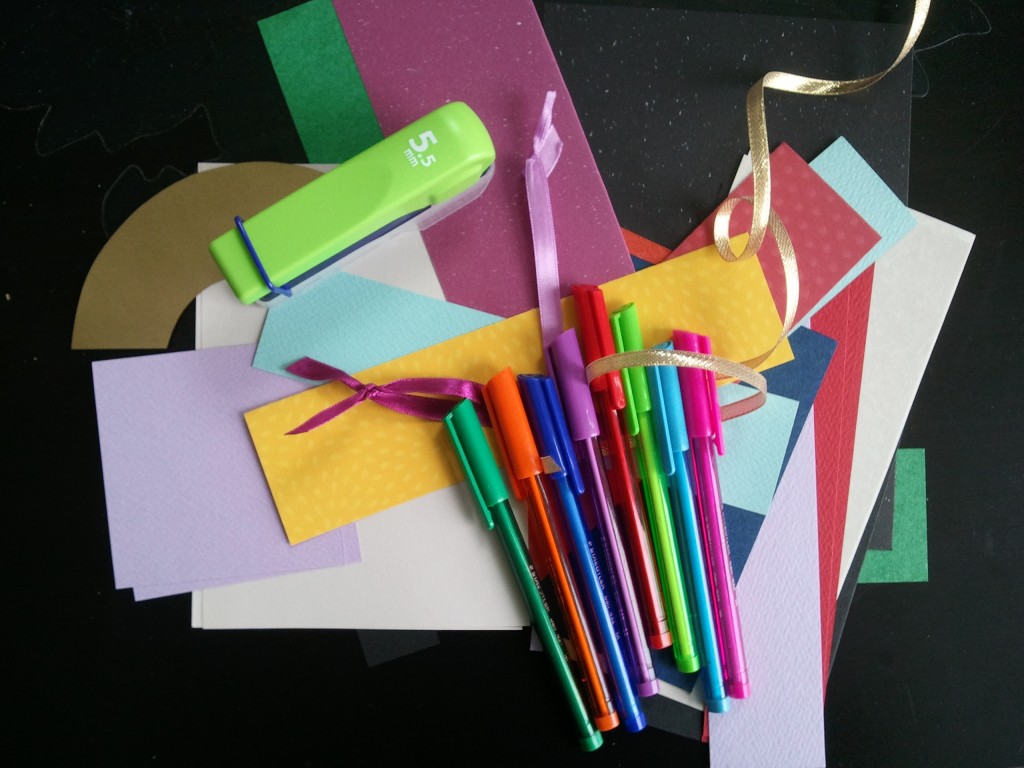
Get out your scraps of paper -any will do. If you have different weights and textures, they can add nice depth when you’re finished.
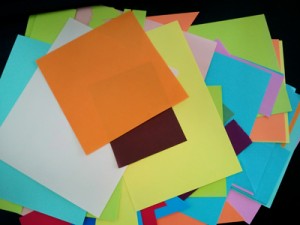
scrap paper pile
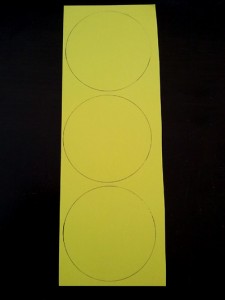
Grab one piece of paper and draw out a bunch of circles (I used the middle of a plastic tape dispenser as my circle template.
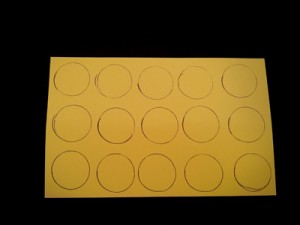
Draw out simple shapes.
Find a good contrasting colour to make the wrapped candy tips. Make sure to measure the diameter of the circle as the long middle so it’s easy to tape to the back of the circle.
Measure the width to sketch out the candy tips.
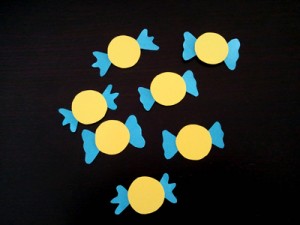
Completed mini candies.
For large lollipops, draw out larger circles just like the little wrapped candies.
Draw out larger circles.
Choose several different colours to combine contrasting ones for each lollipop.
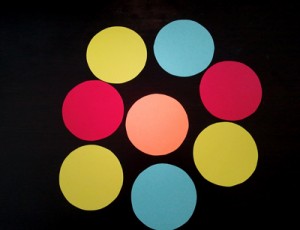
Choose several colours for variety.
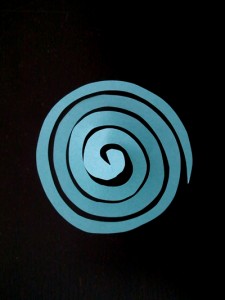
Choose one colour as the base and one as the top swirl. Take the top colour and cut out a swirl. To do this, just start cutting at one point and follow the circle until you reach the middle.
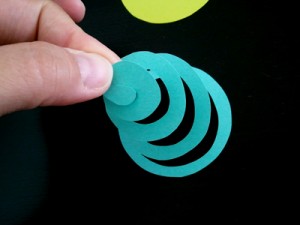
Cut out a swirl.
To make the swirls thinner, cut along the middle of the strip and cut all the way through the middle. This should now give you two thinner swirls. You can use both swirls for lollipops or use one swirl for other hanging decorations.
Thin out the swirl by cutting along the swirl in the middle.
Glue the swirls down on the plain circles for the lollipop top. Cut out a few sticks and just tape them to the back.
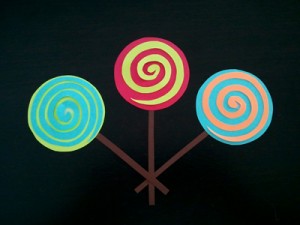
Tape or glue on top of plain circle.
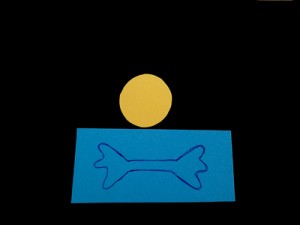
For simple mini heart lollipops, cut out small heart shapes and tape short sticks to the back. Simple!
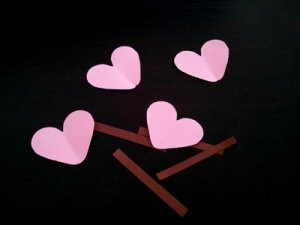
Hearts and sticks from scraps of paper.
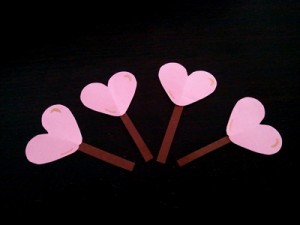
Attach the sticks to the back of the hearts.
I found these fun bright colours and just started cutting out rectangles and trapezoids (essentially a triangle with a cut tip).
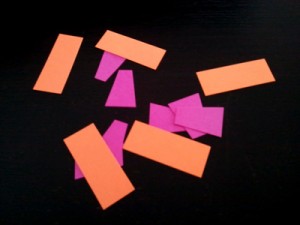
Rectangles and trapezoids from scraps.
Glue the trapezoids to the ends of the rectangles to make a simple type of rectangular wrapped candies.

Rectangular candies.
For smaller scraps of paper, try to pair up shades of long thin rectangles together for candy sticks.

Pair up shades for candy sticks.
Take the lighter shades and cut out diagonal strips (width wise). Discard every other strip and glue the rest on the darker strip.
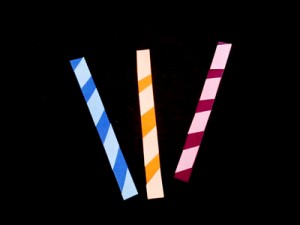
Finished candy sticks.
Once all of the candies are done, arrange them as you like along a string or ribbon. I like to arrange them close together so that the string is barely visible.
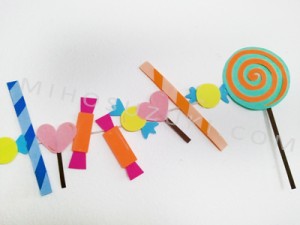
Arrange paper candies however you like.
Finished! Isn’t it adorable? I think it’s a great decoration for Birthday parties, children’s play dates, or even just to dress up the house with something colourful and fun!
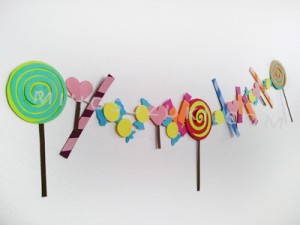
Finished paper candy garland!
Let me know what you think and please send me your variations so that I can feature them on the site!
![]()
Coming up, Paper Candy Garland!
As per usual, I have gone quiet and apologize. I’m preparing an adorable craft that I hope you will all love -a paper candy garland! Please keep an eye out for the post, it’ll be colourful and fun!
10 Craft Bloggers that You Should Know
 There are a lot of bloggers all over the World Wide Web, but there are a certain group of craft bloggers that you should known. Each blogger have their own styles and crafts that you might want to try. Here are 10 craft bloggers that every crafter should know.
Miss Kopy Kat is an arts and crafts blog by Miss Kitty, a mother and grandmother. She loves starting new craft projects but tends to spend a long time to finish even one. She created the blog so she can be pressured to finish her projects. Her blog focuses on crafts and decorations that are inexpensive copies of store-bought ornaments. One of her amazing projects is the Open Frame with Chicken Wire, restyled from an old frame. She used some inexpensive frames from a home improvement store and changed the frame’s color to suit her home. She then bought some chicken wire, and with the help of her husband, she nailed the chicken wire across the opening of the frame. Once it’s done, you can use the frame to hang pictures or postcards and other ornaments on your wall.
Nifty Thrifty Things is a blog by Vanessa, a graphic designer based in Germany. She usually writes blogs about crafts and recipes, decorations and for gifts. Just like her blog’s name, almost all of her crafts are easy, thrifty and cute. Just like her popular nifty thrifty iPad sleeve that she made out of felt and a doily. The best part of the project is the fact that it only cost her $2.50. Cut the felt according to the size of your tablet/iPad, and sew the corners together. Just leave a small space for the flap. Sew on some ornaments (she used another doily) and velcro, and you have yourself a nifty thrifty Tablet/iPad sleeve.
How Does She is a blog made for women, by women. It features recipes, crafts and tips on running a household and raising a family. The blog is founded by Missy, Shelley and Alison, and together with some other female contributors, they give out ideas and tips to all the females out there. One of their amazing projects is the DIY chevron lamp made out of paint and dull lampshades. It is the perfect way to add color to your old lampshades. If you don’t have old lampshades, you can easily buy one in any thrift or antique store. It doesn’t matter how drab or dull they look, because you can glam them up with the help of paint and masking tape.
Zakka Life
Zakka Life is a crafts, recipes and life blog. Most of the posts in this blog are put under different categories. The blog also features Japanese crafts like origami, and uses Japanese materials like washi tape and mizuhiki. Zakka Life has a tutorial on how to make mizuhiki (paper cord) bracelet. Just by twisting the cord, you can have cute bracelets in different colors. Likewise, the blog can teach you how to make phone covers with washi tape. Just buy some plain inexpensive phone covers and decorate them with washi tape for unique and colorful phone covers.
Rebecca’s DIY is a craft blog in Swedish. Despite the language, you can surely follow her tutorials just by looking at the pictures. The blog features cute and easy to make crafts like felt animals, felt hair clips and Christmas ornaments. If you can’t be bothered to try the crafts yourselves, you can always buy items from her Etsy shop.
All Things Paper is a paper craft blog. Here you can find different ways to use and decorate with paper. The blog also promotes recycling and using eco-friendly materials. It features a tutorial on how to make a Christmas tree and ornaments out of paper quills. It sure takes a lot of time to roll and shape the paper strips but you’ll surely enjoy it. You can also find tutorials on how to make note pads and note books from this website.
A blog by Jessica Hill, a self-proclaimed unbalanced crafter, Mad in Crafts features several DIY, crafts, recipes and writing tips for everyone. She uses all kinds of materials, usually recycling and upcycling old things to make them new. In one of her crafts, she used old tea wrappers and made an amazing ombre tea wreath out of these wrappers. She even made snow globe soap dispensers that are perfect as Christmas giveaways!
Bored and Crafty is a blog by Meream, a crafter from the Philippines. She specializes in sewing and crafts from random items like Popsicle sticks, coffee filters and doilies. She loves to make bags and sells them at her store. Some of her amazing crafts are reversible scalloped skirts, a Popsicle chandelier and a mini coffee maker made out of Styrofoam and stickers.
Tea Rose Home is a craft blog by Sachiko that features tutorials and other tips for crafters and artists from all over the world. Sachiko usually uses old items and recycles/upcycles them to make new amazing stuff. One of her best tutorials is the sewing kit made from an old eyeglasses/sunglasses case and her shoe makeover. Just like other craft bloggers, you can also buy her items from her Etsy shop.
Older and Wisor is a sewing and crafts blog where you’ll get to see fun and unique ideas for decorating and making your home beautiful. Most of the tutorials in the blog use old materials and scraps, transformed into beautiful items. For Christmas, she featured different ways to wrap presents using old boxes and reusable shopping bags with letters and twine.
There are many more craft bloggers on the Internet. The trick is to look for the blogs that suit your lifestyle and your preferences. Have fun and enjoy crafting!
Do you know of any awesome crafters that should be in the spotlight? Let me know who they are so I can share with everyone!
![]()
The Top Ten Holiday Pins on Pinterest
With the advent of Pinterest, a lot of crafters and artists now have a venue to showcase their crafts to other people. It is also a good site to look for holiday craft ideas, be it for gifts, decoration or just to keep the kids busy. The best part of “doing your research” on Pinterest is that most pins have easy to follow instructions, so that even first-timers and beginners can make the crafts. Here are the top ten holiday pins that you’ll surely love.
Reindeer Poop
This may sound gross, but if you’ve heard of “reindeer noses”, then reindeer poop is not that different. It is an easy to make gift perfect for kids and even for the young at heart. Just fill a clear cellophane bag with chocolate malt balls and chocolate covered raisins. You can either print out labels or hand-write them.
Painted Gift Boxes
The best thing about making pretty gift boxes is the fact that you don’t have to wrap them in wrapping paper. This craft is very easy and fun to do. All you need are 3D paint and craft boxes in different colors. You can get these in craft stores. Make sure to use contrasting colors to make your designs stand out. You don’t have to be an artist to make the boxes beautiful. Just scribble and doodle on the boxes and you have pretty boxes for your gifts.
Ribbon and Pearl Tree Ornaments
Make your Christmas tree pretty with these ribbon and pearl ornaments. You just need some wide ribbons, pearls or beads and a needle and some thread. Sew the ribbon and pearls alternately to create a Christmas tree shape. Adjust the ribbon to make the shape more pronounced. Add some string on top and hang them on your tree.
Peppermint Dipped Oreos
Who doesn’t love Oreos? Make your Oreos more lovable by dipping them in melted white chocolate and sprinkling some crushed candy canes. These are also perfect as gifts and giveaways. Just wrap them up in clear plastic bags and tie with a ribbon.
Edible Snow Globes
Snow globes are great Christmas ornaments. Make them better by making them edible. Create your own edible snow globes with chocolate chip cookies, white icing, foil wrapped chocolates, candy sprinkles and clear paper cups. Put some white icing on top of the cookies. You can also make snowflakes out of the icing. Once all the icing is dry, stack the chocolates on the cookie (which also serve as the base of the snow globe). Once you’re done, top it with a clear plastic cup.
DIY Menorah
This DIY project is perfect for those celebrating Hanukkah. Make use of your kids’ old plastic dinosaur toys and transform them into holders for your menorah. You’ll need to put some candle holders (the kind that you use on top of a cake) on top of the dinosaurs’ heads or bodies, so the candles are stable. Once you’ve assembled the candle holder on the dinosaur, bring out the spray paint and coat the dinosaurs thoroughly. You can use either gold or silver to make them look more festive (and formal at the same time). Once they’re dry, you can assemble them on top of a piece of plywood or board (painted with the same color). Put the candles on top of the dinosaurs and you have yourself a menorah.
Felt Pinecone
Decorate your home in cute felt pine cones made out of felt and leftover plastic Easter eggs. Just cut the felt into strips, add some ridges and wrap it around the egg. These are cute and easy to make. Now you can put pinecones anywhere in your house.
Holiday Vases
Vases are staples in almost every house, so why not transform these vases to make your house festive for all seasons? All you need are those long cylindrical vases that can be bought in almost any home decoration store. Fill them with Christmas balls or pine cones or a combination of artificial snow, cones, and balls. You can also change what’s inside the vase depending on the season (like Easter eggs during Easter and monsters on Halloween). They’re easy to make and would surely make your home festive.
Gift Card Snow Globe
Here’s a fun and creative way to give away the gift cards you got your friends and family. All you need are mason jars, some glitters, water, and unbreakable ornaments. If your gift card is made out of paper, you can also wrap it in plastic to make it water-proof. Glue one edge of your card on the lid of the jar, put some water, glitters and ornaments on the jar and you have your very own gift card snow globe.
Washcloth Reindeers
We all take a bath, right? Bath essentials are perfect as holiday gifts. Make your gifts cute and fun by creating washcloth reindeers. All you need is a wash cloth and a bar of soap or small bottles of shower gel and shampoo to put inside the washcloth. First, make a diamond shape from the washcloth. Put the goodies on the middle of the washcloth and fold the upper and lower part of the washcloth toward the middle (to hide what’s inside). Then pull the sides together to create “ears”. Use pipe cleaners as antlers. Put some stickers in front of the washcloth for eyes and nose. Now your gifts are good to go.
These are just some holiday crafts that you can do this Christmas. Most of these crafts can be customized depending on the season. Just use your creativity and have fun making crafts.
The Top Ten Holiday Pins on Pinterest
With the advent of Pinterest, a lot of crafters and artists now have a venue to showcase their crafts to other people. It is also a good site to look for holiday craft ideas, be it for gifts, decoration or just to keep the kids busy. The best part of “doing your research” on Pinterest is that most pins have easy to follow instructions, so that even first-timers and beginners can make the crafts. Here are the top ten holiday pins that you’ll surely love.
This may sound gross, but if you’ve heard of “reindeer noses”, then reindeer poop is not that different. It is an easy to make gift perfect for kids and even for the young at heart. Just fill a clear cellophane bag with chocolate malt balls and chocolate covered raisins. You can either print out labels or hand-write them.
The best thing about making pretty gift boxes is the fact that you don’t have to wrap them in wrapping paper. This craft is very easy and fun to do. All you need are 3D paint and craft boxes in different colors. You can get these in craft stores. Make sure to use contrasting colors to make your designs stand out. You don’t have to be an artist to make the boxes beautiful. Just scribble and doodle on the boxes and you have pretty boxes for your gifts.
Ribbon and Pearl Tree Ornaments
Make your Christmas tree pretty with these ribbon and pearl ornaments. You just need some wide ribbons, pearls or beads and a needle and some thread. Sew the ribbon and pearls alternately to create a Christmas tree shape. Adjust the ribbon to make the shape more pronounced. Add some string on top and hang them on your tree.
Who doesn’t love Oreos? Make your Oreos more lovable by dipping them in melted white chocolate and sprinkling some crushed candy canes. These are also perfect as gifts and giveaways. Just wrap them up in clear plastic bags and tie with a ribbon.
Snow globes are great Christmas ornaments. Make them better by making them edible. Create your own edible snow globes with chocolate chip cookies, white icing, foil wrapped chocolates, candy sprinkles and clear paper cups. Put some white icing on top of the cookies. You can also make snowflakes out of the icing. Once all the icing is dry, stack the chocolates on the cookie (which also serve as the base of the snow globe). Once you’re done, top it with a clear plastic cup.
This DIY project is perfect for those celebrating Hanukkah. Make use of your kids’ old plastic dinosaur toys and transform them into holders for your menorah. You’ll need to put some candle holders (the kind that you use on top of a cake) on top of the dinosaurs’ heads or bodies, so the candles are stable. Once you’ve assembled the candle holder on the dinosaur, bring out the spray paint and coat the dinosaurs thoroughly. You can use either gold or silver to make them look more festive (and formal at the same time). Once they’re dry, you can assemble them on top of a piece of plywood or board (painted with the same color). Put the candles on top of the dinosaurs and you have yourself a menorah.
Decorate your home in cute felt pine cones made out of felt and leftover plastic Easter eggs. Just cut the felt into strips, add some ridges and wrap it around the egg. These are cute and easy to make. Now you can put pinecones anywhere in your house.
Vases are staples in almost every house, so why not transform these vases to make your house festive for all seasons? All you need are those long cylindrical vases that can be bought in almost any home decoration store. Fill them with Christmas balls or pine cones or a combination of artificial snow, cones, and balls. You can also change what’s inside the vase depending on the season (like Easter eggs during Easter and monsters on Halloween). They’re easy to make and would surely make your home festive.
Here’s a fun and creative way to give away the gift cards you got your friends and family. All you need are mason jars, some glitters, water, and unbreakable ornaments. If your gift card is made out of paper, you can also wrap it in plastic to make it water-proof. Glue one edge of your card on the lid of the jar, put some water, glitters and ornaments on the jar and you have your very own gift card snow globe.
We all take a bath, right? Bath essentials are perfect as holiday gifts. Make your gifts cute and fun by creating washcloth reindeer. All you need is a wash cloth and a bar of soap or small bottles of shower gel and shampoo to put inside the washcloth. First, make a diamond shape from the washcloth. Put the goodies on the middle of the washcloth and fold the upper and lower part of the washcloth toward the middle (to hide what’s inside). Then pull the sides together to create “ears”. Use pipe cleaners as antlers. Put some stickers in front of the washcloth for eyes and nose. Now your gifts are good to go.
These are just some holiday crafts that you can do this Christmas. Most of these crafts can be customized depending on the season. Just use your creativity and have fun making crafts.
