One Good Thing a Day – Project Day 81 – Mini Winter Landscape
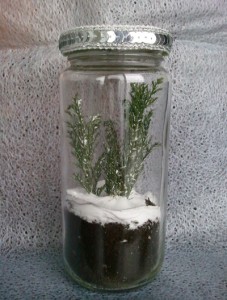
Since all of our weather is rainy and pretty dull, I’ve decided to make myself a mini winter landscape -surprisingly calming.
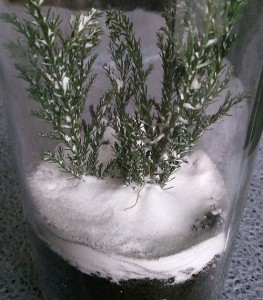
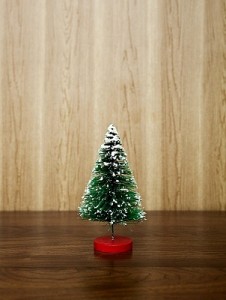
I simply took an empty glass jar, a little soil from one of my plants, baking soda and a couple of snips from my mini potted Christmas trees. To decorate the jar lid, I just added a sequinned ribbon with double-sided tape. 2 minutes max!
End result:
One Good Thing a Day – Project Day 80 – Holiday All Around
Slowly getting into the holiday spirit but all of the lovely decorations and activities are certainly helping!
Finished shopping, wrapping and even decorated adorable cookies last night with great friends -what more could I ask for this holiday season? (Less boring work please!)
I thought there was great shopping atmosphere -which is especially significant since I absolutely HATE shopping!
Guest Post: 8 Inexpensive Last Minute Holiday Decor Ideas that No One Else Will Have Thought Of!
Decorations transform a house into a home. They are one way a family add their personal touch to an otherwise non-descript building. During the holiday season, many people have similar decorations. People will hang lights and wreaths, decorate trees and place cookies on the table. Here are eight ways to make a home uniquely festive this holiday season…even if you are in a rush and have family on their way!
1. Candy Garland
Garlands are a standard decoration, but they do not have to be created in a standard way. Rather than making traditional garlands of popcorn and cranberries, use brightly wrapped candies. Staple together a bunch of candies and hang them around the home. A single color will create a conservative look, while two colors will add more flair. However, limit the colors to two; otherwise, the garland may lose its elegance. Also, be sure to place some candies for eating nearby. Candy garlands are a lot more tempting than stale popcorn and sour cranberries.
2. Evergreen Garland
Another fun way to make garland is from evergreen boughs. These can often be gathered from a nearby park. If there are none on the ground in your area, call a tree trimming service, because they may have some to give away for free. Tying these together in a bright red fabric creates a natural garland, which can be hung indoors or outdoors.
3. Cinnamon Stick Potpourri
When decorating, people should not consider the visual sense only. The holidays are filled with music that sings to the ears and foods that taste delicious. Cinnamon Stick Potpourri can tantalize guest’s sense of smell, while adding a cute aspect to decorations. These are quick, inexpensive and easy to make. Take a few cinnamon sticks, and tie them together with festive ribbon. If they are being placed along evergreen boughs, red works best. In other places, green and plaid are also great options.
4. Teddy Bear Chair
Children will gladly help with this decoration. Send them around the house on a scavenger hunt for all the teddy bears hiding in bedrooms and closets. Then, neatly arrange your teddy bear colony on a big chair. Any drum bears can be dressed up with ribbons, and they can all hold a small, brightly wrapped present.
5. Table Setting Bow
Whenever guests are coming over for a fancy sit-down meal during the holidays, tying a bow around their place setting adds a formal, but fun aspect to the occasion. Arrange the silverware and napkin neatly on the plate, and then tie a ribbon around the ensemble. After dinner, clean ribbons can be reused at another dinner or tied around presents.
6. Christmas Plants
During this season, every plant can become a miniature Christmas tree. Hang small ornaments from any house plants, using silver or gold fabric in place of ugly hooks. Who knows, maybe miniature presents will even appear under these “trees.”
7. Doily Table Runner
This time of year is the most popular season for table runners. Yet, yours can be unique. To create a distinctive table runner, collect old doilies from anywhere they can be found: you attic, your mother’s attic, your grandmother’s attic, garage sales and Craigslist. Then, arrange them on the table. Tie them together with white string, and trim the excess string. The result will be a snowflake-like table runner that cannot be found in stores.
8. Creative Candles
Rather than spending a lot of money on decorative candles, consider decorating plain candles. Select a few white pillar candles and purchase a collection of thumbtacks or pushpins, which can be used again next year. Wrap a rubber band around the candle for a guide, and then insert the pins. For the best results, limit yourself to two different colors. After removing the rubber band, you will have a candle that no one else does.
With these eight ideas, your house will become a home unlike any other. These creative ideas allow families to express themselves, but keep them simple. Elegance is often found in simplicity. Have fun this holiday season transforming your home.
Author Bio: Zach D. writes for Design55, a UK-based, online, modern furniture shop that carries such notable lines as Alessi and Blomus.
Guest Post How-to: Create An Inexpensive Mini-Christmas Tree
As the winter holidays near, children both young and old start thinking of presents, decorating the tree and travel plans. For those of us who plan on staying at home and enjoying the company of family and friends, enjoyment of decorating the house might war with expenses often incurred during the holiday. Fortunately, low-cost options exist through simple and fun craft activities that can involve the whole family. Kids especially can enjoy many easy projects that keep them occupied and happy. These child-oriented crafts are tailored specifically for them.
DIY Mini-Christmas Trees
All you need for this craft activity is a cardboard roll, such as those from paper towels or toilet paper, depending on the height of the trees you desire. The higher the tree, however, the more pipe cleaners you need, which is the second item on the list. You might also use some tinsel, stringed popcorn and small ornaments.
Some families create mini forests of Christmas trees and use one small-bulb string of lights draped carefully across and around each tree.
Additional items needed include aluminum foil, wire cutters to trim pipe cleaners, colored construction paper if desired or markers or crayons.
Take one bare cardboard roll and cover it in one solid color. This will be the trunk of your Christmas tree, and while actual trunks are brown, if you wish to include winter and winter-holiday pictures on the trunk, a lighter color might be more appropriate. After the trunk is colored, decorate with pictures and symbols as you wish.
Next, take one pipe cleaner and snip it into four equal pieces; color if desired. Carefully insert one end about 0.25 inches into the bottom of the trunk about 0.25 inches from the bottom. Rotate one-fourth of the way around. Repeat until you have your tree brace fully inserted. Carefully bend the pipe cleaner to rest inside and outside along the trunk; splay all four outer legs out until the trunk can stand upright steadily.
Bend one end of full-length pipe cleaners and insert the bent end then rotate so the inner brace holds the pipe cleaner. Repeat and place in a random row and build your tree branches upward, trimming each row of pipe cleaner branches to a smaller size before inserting. By the mid-way point, you may be able to use your trimmed portions as the upper, shorter branches.
Decorate your mini Christmas tree with small, lightweight decorations, bulbs and ornaments you can create yourself. After designing and creating each decoration, use small, bent paperclip as your tree hooks.
Add small strands of tinsel, popcorn, candy canes and lights as you desire and display proudly as a centerpiece, on a bookshelf or table!
Making Lightweight Ornamental Figurines
Using either thin, flat cardboard, tin foil or construction paper, cut the media into the shape desired. Decorate with pictures, colors and glittered or sequined designs. Carefully insert one end of a small paperclip through the top center of the ornament and rotate the clip around until the decoration rests on the inner-most loop. Bending the other end outward only slightly, hang your ornament on the mini-tree you created.
To create a star for the top of the tree, use tin foil and fold or cut a star. Using more than one layer adds stability. Using a small cone from folded paper, pinch the top flat and connect to the back of the star. Use the bottom of the cone to seat the star atop your tree.
Congratulations! You’ve created your own DIY mini-Christmas tree and saved a fair amount of money on commercial decorations!
Article by João Mortalha. João is part of the Coupon Croc team that works hard to find the best deals, coupons and discount vouchers so that you can save money.
Guest Post: DIY Gingerbread Houses
Everyone who knows the story of Hansel and Gretel is doubtlessly aware of the appeal of gingerbread houses! My kids always loved the story, and came home for the holidays especially excited to build their own gingerbread houses. Apparently, some fellow students from their adventure boarding school were gingerbread house experts, and gave my own kids some helpful tips for creating top of the line gingerbread houses of their own.
With the holiday season rapidly approaching, now is the perfect time to spend quality time with your family by creating your own festive themed gingerbread house. Follow these quick and simple instructions to create the perfect gingerbread house for your own family. You can thank my kids for their insight later!
1) To save on cooking time, buy sheets of pre-made gingerbread. These can usually be bought from your local supermarket or at arts and crafts stores. Cut the sheets into the desired outline of the house using scissors or a knife. You can be as creative as you want here with this part; remember that it’s your house and it can be designed according to your desires.
2) Once you have cut all the walls, base and roof for your gingerbread house, you may want to cut out some squares on the side of the house to form windows. This makes for a nice touch, and makes it look a little more realistic. Before putting the house together, make sure to leave some interesting things inside.
3) Next step is putting the house together. You can use icing to glue the house together, which you can either make yourself or buy from the grocery store. Simply paste the icing along where you want the parts to stick together and then put your walls and roof into place. Voila, by now you will have the structure of your holiday gingerbread house up and running.
4) To finish off your gingerbread creation, decorate the walls and roof with icing and candy. Any kind of candy can be used, but hard candy usually looks the best. Glue the pieces of candy onto the house using icing, and use any left over icing to create patterns that look like snow. This is usually the part kids love the most, so be imaginative and remember to have fun!
Now that your gingerbread house is complete, display it somewhere prominent and where people can really admire it. Be sure to take a snapshot of you and your kids with your homemade gingerbread house. This is a family project you will want to remember! Happy Holidays!
This is a great choice as an adventure boarding school downtime activity or something to enjoy with the whole family at home.


